
How to complete your registration application
On this page:
- Step 1: Complete the information required to apply for registration with UNHCR
- Step 2: Add your family members
- Step 3: Add your registration reasons
- Step 4: Add your preferred location for your registration interview
- Step 5: Review your application
- Step 6: Submit your application and request an appointment
- Step 7: Ready to start? Sign up now
Step 1: Complete the information required to apply for registration with UNHCR
Fields marked with a red asterisk (*) in the portal are required and cannot be left blank.
1Personal Information
- First name, father’s name, and last name in Latin characters only (e.g., a, b, c).*
- Full name: Your full name in your Arabic language.
- Date of Birth: As shown in your official identity document.*
- Where you are from: Select your country from the list of options. If you have more than one nationality, choose the one from the country you cannot return to.*
- Sex: Select from the options provided.*
- Religion: Select from the list
- Ethnicity: Select from the list
- National Number: From your national ID or civil registration.
- Marital Status: Select your current status.*
Click “Next” when complete. You can also save and continue later.
- Address and arrival date: Enter your address in your home country, your current address in Iraq, and the date you arrived in Iraq, and the date you arrived in Iraq.
- Where are you from? ➡️ Previous address in your home country
- Country (pre-filled based on where you are from), governorate, district, and full address.
- Where do you live now?➡️ Current address
- Country (pre-filled based on where you are from), governorate, district, and full address.
- Arrival Date in Iraq
Click “Next” to continue, or “Previous” to go back. You can save and continue later.
- Review Your Details: You will see a summary of your personal and address details you provided. Please review to ensure all information is correct. To make changes, click “Edit personal details” or “Edit address/arrival”. When done, click “Next”.
- How to contact you:
- E-mail address: Already filled, cannot be changed.
- Phone number: This number is the one you added when you created your account.
- You can tick the box if you would like to be contacted by SMS.
- You can tick the box if you would like to be contacted by WhatsApp and provide your number.
- Preferred language: Select from available languages (English, Arabic, Kurdish Badini).
Click “Next” to continue, or “Previous” to go back. You can save and continue later.
- Your specific needs: Indicate if you or your family members have specific needs, such as medical conditions, or safety concerns.
Click “Next” to continue.
2Photo
Take or upload a recent photo of yourself (passport-style).
While taking your photo, make sure:
- Your full face is visible and well-lit.
- Your eyes open and looking at the camera.
- Not hats or glasses (headscarves are allowed).
- Photo is clear and not blurry.
- Plain background.
Tip: If the camera is not working, check your phone settings to allow camera access.
You can retake or upload a new photo if needed. You may skip this step temporarily but must submit a photo before completing your application.
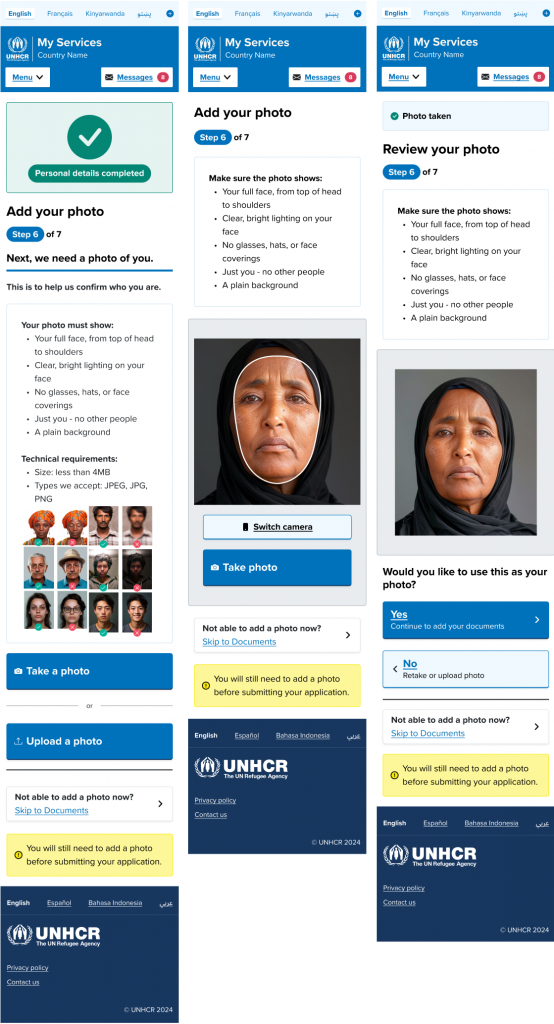
You can review the photo you took. If the photo is correct, press “Yes – continue”. If you want to take or choose a new one, press “Retake or upload photo”. If you are not ready to add a photo, you can press “Skip to Documents” to continue, but you must submit a photo before completing your application.
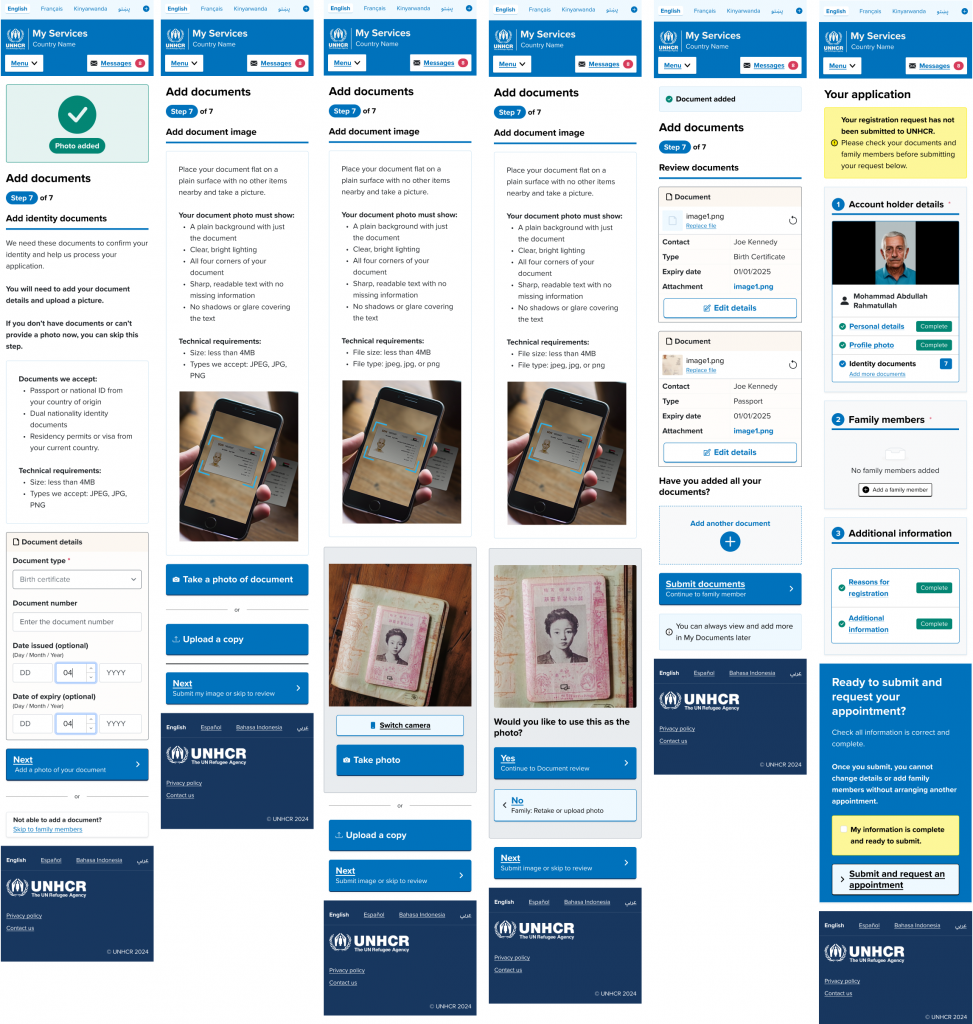
3Documents
You are encouraged to upload identity documents such as your passport or national ID. If you do not have any, you can skip this step. Your family members’ documents will be entered when you add your family members to your application. Documents you are encouraged to upload are:
- Passport
- National ID
- Family Booklet
- Birth Certificate
- Others
Upload clear photos of your documents:
- All corners visible,
- No glare or flash,
- Not blurry,
- JPG or PNG format, up to 4MB.
For each document:
- Select the type (e.g. passport, birth certificate)
- Enter the document number, issue date, and expiry date (if available)
Review and submit the documents when done. You can return to this section later in “My Documents”.
Step 2: Add your family members
Only close family members currently with you in Iraq and not registered with UNHCR should be (e.g. your children, spouse, or elderly dependents).
You will need to provide the personal details, photos, and documents for each person.
We recommend they are with you when filling in their details, or that you make sure to have all their documents and photos before you start adding them.
Step 3: Add your registration reasons
Select the reasons you are applying for registration with UNHCR.
You can choose more than one reason and write a short explanation (limit: 100 words).
This applies to your whole group.
Step 4: Add your preferred location for your registration interview
Choose your preferred location from the below list:
- Baghdad City
- Centre and South Governorates
- Kirkuk
- Mosul
- Erbil City – Baherka Registration Centre
- Dohuk City – Domiz Registration Centre
- Dohuk – Gawilan Camp
- Dohuk – Zakho
- Sulaymaniyah City
- Sulaymaniyah – Arbat Camp
Step 5: Review your application
Check all information is complete and accurate before submitting:
- My Profile: Personal details, contact details, and photograph.
- My Documents: Your uploaded documents.
- My Family: Information, photos and documents for family members.
If everything is correct, click “My information is complete and ready to submit”. If you identified an error or missing information, you could go back to that section and make the necessary corrections and/or add the missing information.
Note: After submission, you will not be able to edit your information or add family members unless you submit a new request.
Step 6: Submit your application and request an appointment
- Click “Submit my application”,
- You will receive a temporary UNHCR ID number (also visible on the Home page),
- Your status will show as “pending registration” until you complete your registration with UNHCR,
- You will see your pending appointment request on the page,
- UNHCR will contact you using your preferred method once your appointment is confirmed.
UNHCR will contact you within two weeks. This does not mean your interview will happen within this period.
Step 7: Ready to start? Sign up now
Still have questions? Have a look at our FAQs ?
How long does it take to fill in the application on My Services portal?
It takes about 10 minutes per person. The time depends on how many family members you include in your application.
If you need help to create your account or complete your application, you can [If you need help to create your account or complete your application, you can visit UNHCR help page where you can find videos and step-by-step guidance to use the portal or you can call UNHCR hotline on 0662330304 where dedicated staff will support you. Please remember that you can also submit your request for registration via Online form UNHCR Iraq Registration Appointment.
Why should I add my family members?
Adding your family members helps keep your family together during the registration process. Everyone you add must come to the appointment with you.
Who can I add as a family member?
You can add:
- Your spouse,
- Your children under 18 years old,
- Close family members living with you and dependent on your support.
Do I need to add everyone before submitting?
Yes. You should add all family members you want to register with you before submitting your application. You cannot add more later.
What if a family member joins me later or leaves before the interview?
If someone joins or leaves after submission, you cannot update your application. Please tell UNHCR during your interview.
Can I add someone who is not here yet?
No. Only include family members who are currently with you. You can ask UNHCR during your interview how to register those who arrive later.
What documents can I upload?
Passports, national ID cards, family booklet, birth certificates and others.
Can I use expired or damaged documents?
Yes. Expired or damaged documents are still helpful. Bring the original with you to your interview.
What if I do not have any documents?
You can still complete your application. Explain the situation during your interview and bring any supporting information you have.
Can I upload a photo of a document instead of a scan?
Yes, but make sure the photo is clear. If needed, you can show the document during your interview.
How are my documents and photos protected?
Your information is stored securely and only used by authorized UNHCR staff to process your application, in line with UNHCR’s data protection rules.
Can I see or change the information I submitted?
Before you submit, you can review and edit your details.
After submission, only your contact details can be changed. If anything else is incorrect, inform UNHCR during your interview.
How do I update my specific needs?
You can update this information before submission. After submission, please inform UNHCR during your interview.
Can I change the appointment location later?
No. If you need to request a change, please contact UNHCR.
Changing your residence permanently requires change for your government issued documentation and accordingly is subject to government procedures and approvals.
What does “registration status” or “verification pending” mean?
This means you and your family have submitted your application and are waiting for UNHCR to review and verify your information.
What is my application ID number used for?
This number helps UNHCR identify your application. Keep it safe and use it if you need to contact UNHCR about your case.
What happens after I submit my application?
You will receive a confirmation and a summary of your application by e-mail. UNHCR will review your information and schedule an appointment.
How long does it take to get a registration appointment?
UNHCR will contact you within two weeks with the date, time, and location of your appointment.
How will I know when my appointment is booked?
You will receive a message through your preferred communication method. The appointment details will also appear under “Confirmed Appointments” in the My services portal.
What happens when my children turn 18?
You manage your child’s account until they turn 15. From 15, they can access their account if they have their own e-mail. At 18, they must create their own account.
What is the application summary, and how can I use it?
The application summary is a PDF copy of the information you submitted when you created your account.